

How To Animate A Picture In Google Slides
Animation tin can be a smashing way to bring your presentation alive, and make it more engaging for the viewer. It's too an like shooting fish in a barrel style to add some variety into what might otherwise exist a very static document. Animative in Google Slides is actually quite simple and straightforward.
To breathing in Google Slides, select the object (text, shape, or image) and right-click on it. From the bill of fare, click on "Animate". In the "Move" settings pane that opens on the right, choose the "Animation Type" and "Outset condition" from the dropdown options under "Object Animations".
In this article, yous will larn how to animate objects, text, bullet points, add delay, edit animations, and even delete animations – also as everything else that you lot demand to know nearly animations in your Google Slides presentations!
I shall be covering the basics so you will be able to follow along even if you are a beginner. If you are an advanced user and are looking for specific animation instruction, I advise that you skip the beginner data at the start, and scroll down to find the relevant information.
Let me commencement start with the basics of animations in Google Slides. So, without further delay, permit's become to it!
A Quick Notation Before We Brainstorm – if you lot want to make jaw-dropping presentations, I would recommend using one of these Presentation Designs. The best part is – it is only $16.5 a month, but you go to download and use as many presentation designs as you lot like! I personally use it from time-to-time, and it makes my chore of making beautiful presentations really quick and easy!
one. What does Animation Mean in Google Slides?
The word 'animation' in itself refers to the technique used to move inanimate objects in order to bring life to pictures or graphics.
Animation in Google Slides allows objects to move or fade in or out of the slides. This feature on Google Slides enables yous to insert multiple effects on your slides. Animations tin be used to focus the attention of your audience on the specific part of the slide or even make your presentation more engaging!
Google Slides is equipped with tons of features that volition help you to amplify your presentation without having to practice much. It also allows yous to suit the speed of each result by dragging the animation speed slider. This allows you to put a professional bear on your slides.
In Google Slides, y'all can utilise animations to text boxes, shapes, pictures, bullet points, graphics, and icons.
One thing that you need to go on in mind is that while using animations on Google Slides, practise not get carried away with too many animations and transitions. Brand sure y'all do not overpower your message with also many effects.
One last thing before we motility on to the next section is to remember non to confuse animations with transitions in Google Slides. Permit's talk about the differences between animations and transitions in a flake more particular in the adjacent section.
two. Difference Between Animation and Transition in Google Slides
Information technology is easy to become confused between "Animations" and "Transitions" in Google Slides since both add movement outcome and motion in the presentation. Still, they are not the aforementioned affair.
The primal difference between blitheness and transition in Google Slides is that blitheness is applied to objects nowadays on a slide, whereas transition is applied to the slide itself! Blitheness effect is visible on the slide while transition outcome can be seen when you move one slide to the adjacent.
Thus, information technology is important to remember that these two tin not exist used interchangeably. However, these move furnishings can be used together.
Pro Tip!
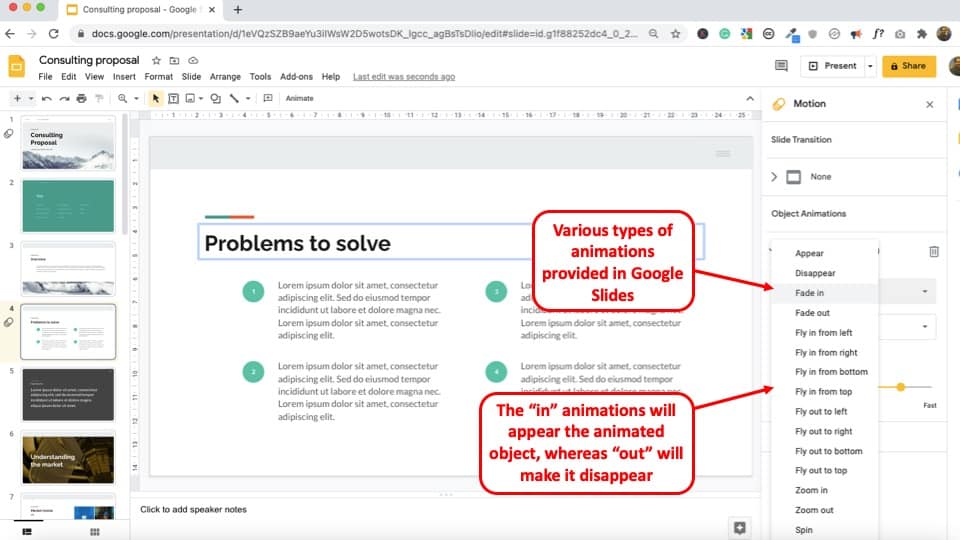
Animations in Google Slides are of two types – a.) ones that volition make your elements appear (ordinarily contain the give-and-take "in" in it), and b.) ones that volition make your elements disappear from the slide! (usually contain the globe "out" in it)
Let'due south understand the types of animations and transitions before nosotros move on the next section –
Types of Animations in Google Slides
In that location are a total of xiii animation types that are available in Google Slides. These are as follows –
- Announced
- Disappear
- Fade in
- Fade out
- Fly in from left
- Fly in from right
- Fly in from top
- Fly in from lesser
- Fly out to left
- Fly out to top
- Fly out to bottom
- Zoom in
- Zoom out
A quick way to sympathise these animations is that when the animation has the discussion "in" mentioned in it, that animation result will make the object appear on the slide. The animation with the word "out" mentioned, will make the object disappear from the slide.
Some other glance at the list in a higher place (with the information about the 'in' and 'out' blitheness types), and you will peradventure detect that in reality, Google Slides actually merely provide 4 animations i.e. Appear, Fade, Fly, and Zoom.
The other animation types provided are either to use the same effect to make the element disappear or use a variation of the same blitheness effect in Google Slides.
Transitions in Google Slides
As mentioned earlier, the motion event that takes place while switching from one slide to another is denoted as Transition. Past default, you volition not come across any transitions applied as they are turned off. However, you tin can enable them pretty hands.
Slide transitions actually deserve a completely different mail altogether! (which I program to cover in the virtually future). For now, allow'due south accept a expect at the various transitions provided in Google Slides –
- Dissolve
- Fade
- Slide from correct
- Slide from left
- Flip
- Cube
I promise this has helped y'all differentiate between animation and transition in Google Slides.
3. How to Breathing in Google Slides?
Now that we have understood the basics, let united states of america now learn how to add together animations to your Google Slides presentation. Call back, yous can add together animation to different objects including text, images, objects, shapes, icons, graphics, tables, etc.
Regardless of what chemical element you plan to consider, the process of calculation animations to each of those elements is going to be quite similar.
That said, for the sake of this article, I'1000 going to consider adding animations to text, and adding animations to images and text as an example. Plus, I will prove you multiple different ways in which you tin can add animations to the objects in Google Slides.
3.ane How to Animate Text in Google Slides?
Here's a step-past-stride procedure to add together animations to text in Google Slides –
Step-one: Open Google Slides
To open up a Google Slides presentation, simply click hither or visit slides.google.com. Brand sure that you are logged into your Google account to open a new presentation.
Step-2: Select the Text and click on the "Insert" Carte

One time you've opened a new presentation, type out your desired text on your selected slide. Select the text and click "Insert", which you will notice on the height left corner of your screen. Choose the "Animation" option from the dropdown carte du jour.
Step-three: Select the Animation Type and Start Condition from the Motion Pane
After clicking on "Animation" you will run into a new window open up on the correct side of the screen. This will help you adjust the motility settings.
Pro Tip!
Google Slides allows for three start weather for animations namely a.) on-click, b.) with previous, and c.) afterward previous. These settings help determine when the animation should start playing and depending on your chosen setting, it could be played on a click of a button, with a previous animation, or subsequently an animation is completed.
Under the "Object Animation" section, choose the "Blitheness Type". In the higher up example, I've gone with the "Fade in" blitheness.
Next, choose the "Beginning Condition". Yous can choose to starting time the animation on click, with previous (animation), or afterward previous (blitheness).
three.two How to Modify Duration of Animations in Google Slides?
Google Slides also allows you to slow downwards or make the animations announced quickly! This can be done using the "duration" setting for blitheness.
Here'due south how you tin can alter the duration for animations in Google Slides –
Step-i: Select the Object to Change Animation Duration
The start pace is to select the text or other object that already has the blitheness added. Y'all tin select it by clicking on it.
Pace-2: Open the Movement Settings Tab past Clicking on View
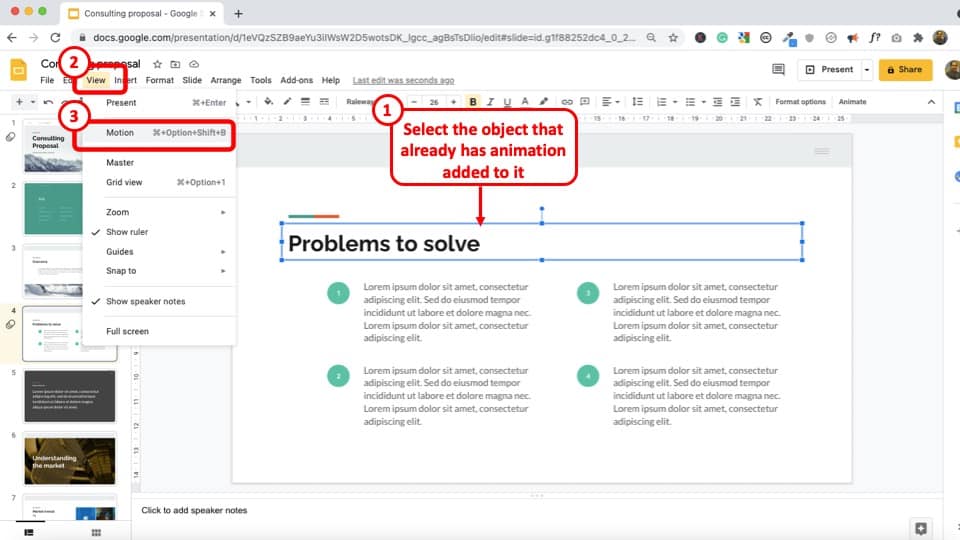
If an object has animation already added to it, then click on the "View" tab. From the dropdown, click on "Move".
This will open the "motion" settings window on the correct office of your screen.
Pro Tip!
To make changes to an existing animation, always open the "Motion" tab first from the "View" menu. By using the "Add together Animation" choice from the "Insert Card" (or past whatever other method), will add an additional animation to the same object!
It is important to note that if y'all select an object that already has an animation added to it, then click on insert, and add animation as described in the previous department, y'all will end upward adding some other animation to the aforementioned object instead of editing the existing animation.
Footstep-3: Alter the Elapsing of the Animation

The last thing that yous would want to do is to change the duration of the animation by dragging the "Duration" slider towards the left or the right.
Dragging the slider towards the left will result in slowing the blitheness, while dragging it towards the right volition make the animation speed up.
3.3 How to Reorder Animations in Google Slides?
Sometimes, y'all may add together animations in the wrong order. In such a scenario, you may want to change the order in which the animations announced. This can also be washed easily in Google Slides.
Here's how to change the order of the animations in Google Slides –
Step-1: Open the Motion Settings Window from the View Menu
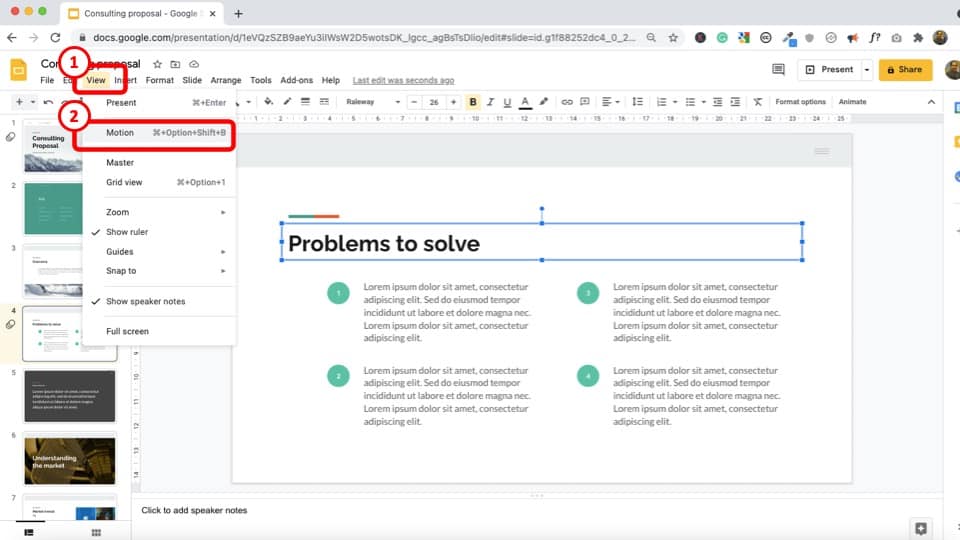
If you don't take the motility window open, then become to the "View" menu, and click on "Motion" to view the existing animations that are nowadays on the slide.
Stride-2: Change the Order of the Animations from the Motion Window
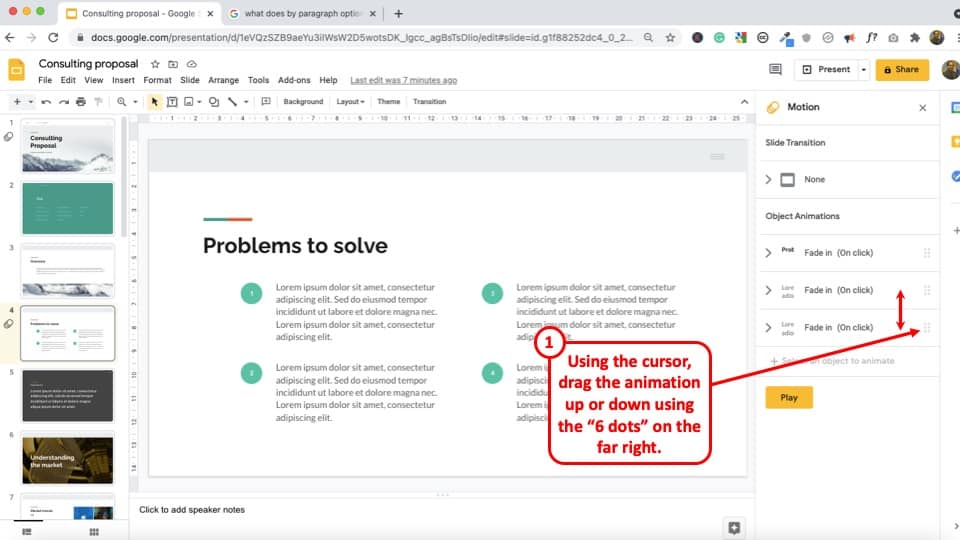
Choose the animation that you want to change the order for. Then, in the "Motion" window pane, hover over on the "6 dots" at the far right of the blitheness until the cursor changes to a crosshair. Then, click and drag the animation up or downward every bit per the requirement.
Step-three: Click Play to Review the Changes
Every bit a final step, click on the "Play" push button on the Movement settings window pane to review if the order of the animation is as per requirement.
three.4 How to Remove Animations in Google Slides
Sometimes, you may have added an animation to an object or text by mistake. In that case, you lot may like to remove the added animation. In case you are wondering, here's how to remove the blitheness in Google Slides –
Stride-1: Go to the Slide Containing the Animation to be Deleted
First, you should get to the slide which contains the animation you want to remove or delete.
Footstep-ii: Open the Motion Window and Select the Animation to exist Deleted
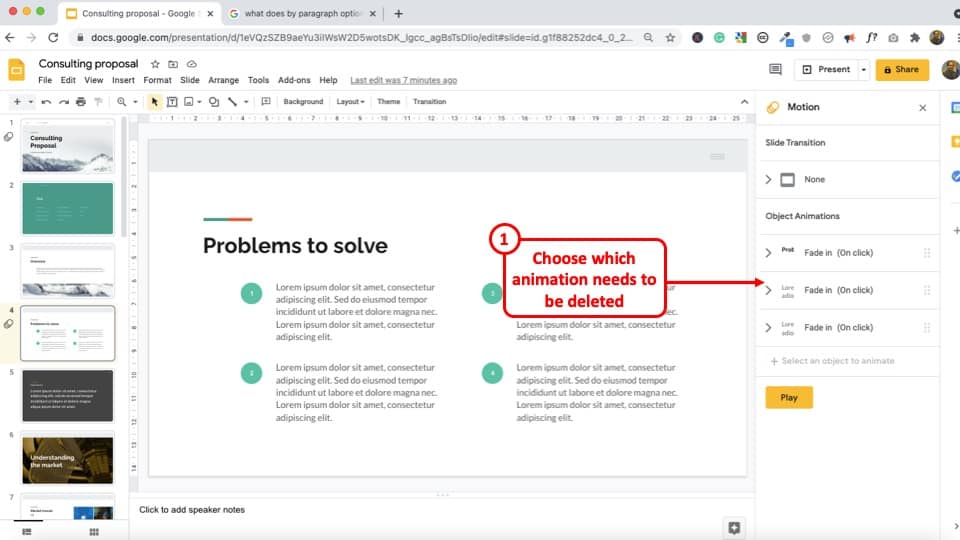
From the animation airplane, select the animation that y'all desire to remove or delete.
Step-3: Select the Animation and Press the "Delete" button

Press the "Delete" button or icon to remove the chosen animation. Follow the same method to delete whatsoever animation that you want to remove.
4. How to Animate Bullet Points in Google Slides?
Having bullet points on our presentation tin can be helpful when we want to summarize key pieces of information. However, how do you animate bullet points in Google Slides? In this department, I volition share a cool tip to assist you lot animate bullet points quickly.
Here'due south what you need to do to breathing bullet points in Google Slides –
Step-1: Select the Bulleted List
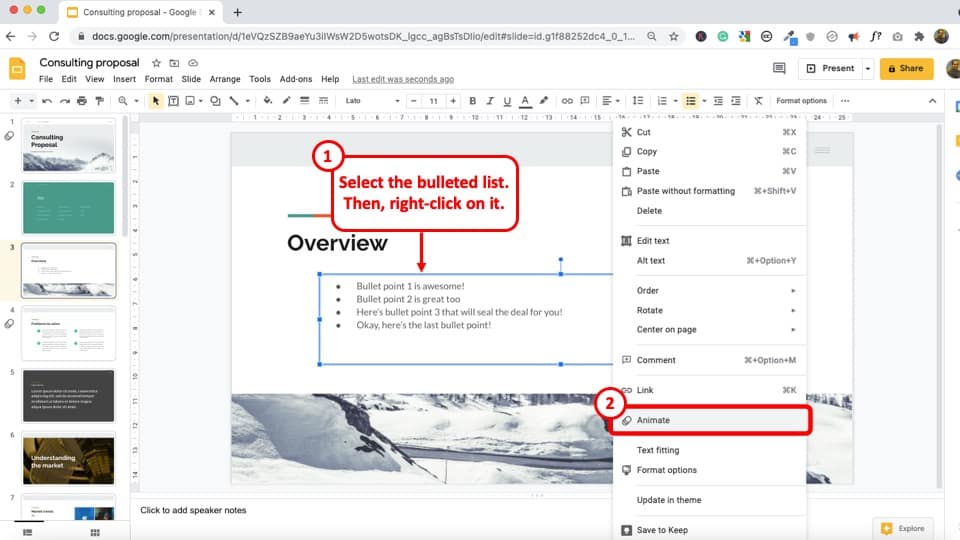
Click on the Bulleted list yous desire to animate and "Select" it.
Step-2: Press Right Click and Select Animate
Right click on the mouse and select the "Animate" tab to add animation to the bulleted listing.
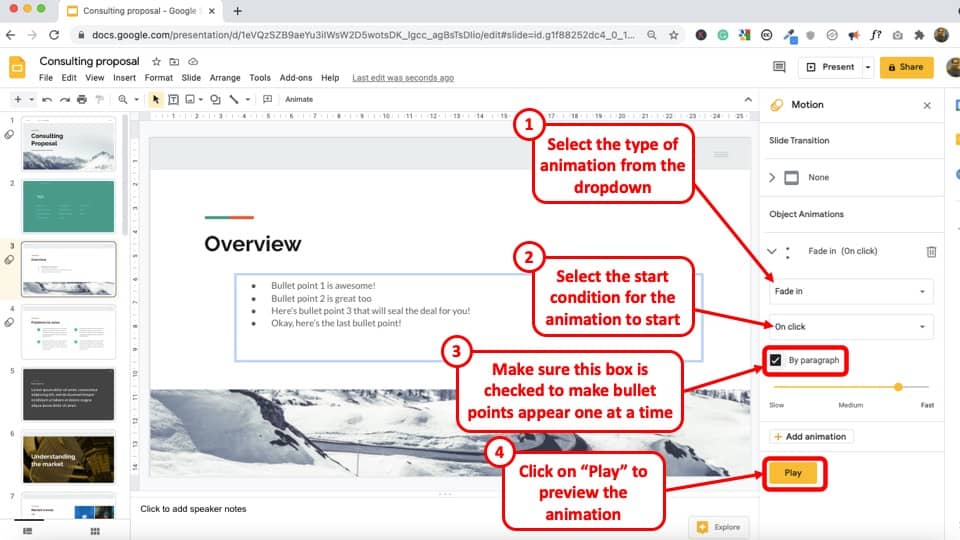
Stride-3: Select the Blazon of Animation
Depending on the type of animation you desire, click on "Fade in" tab to select on the blitheness way.
Step-4: Select the Start Status and enable "By Paragraph" setting
Depending on when yous desire the Bulleted List to testify, select the "On Click" tab. Next, make sure that you click on the "By Paragraph" setting. This will permit the bulleted points to announced ane at a time.
Step-five: Preview the Animation to See the Result
To preview the animation of the bulleted points, click on the xanthous "Play" tab at the lesser of the section.
Press the yellow "Stop" button when you lot desire to end the preview of the animation.
5. How to Breathing Image and Objects in Google Slides?
Animative images and other objects in Google Slides works just the same way you would animate text. That said, I shall prove y'all another way to admission animations option for adding animations on Google Slide.
Step-1: Select the Image or Object
Select the image or object that needs to exist blithe. You tin do that by clicking on it.
Footstep-2: Click on "Breathing" Pick on the Toolbar
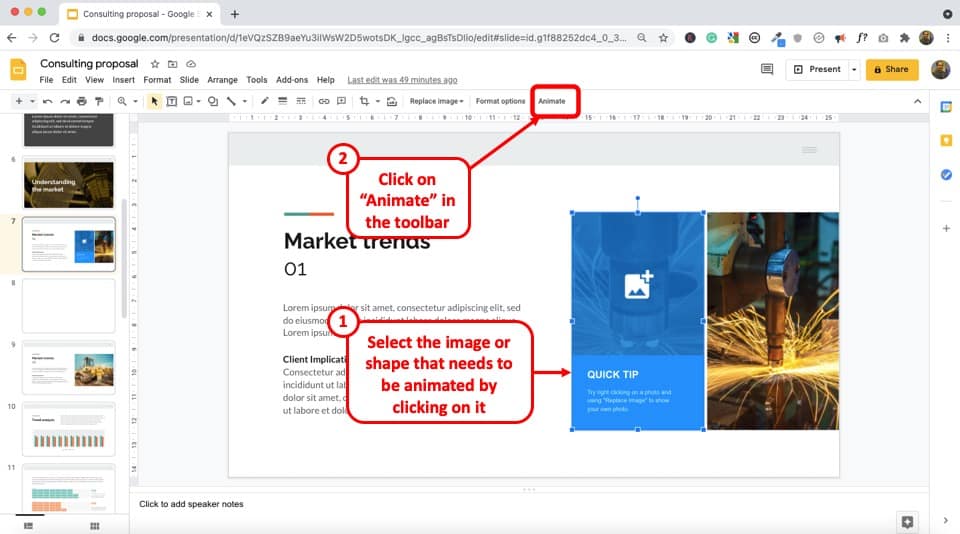
Once the image is selected, you will find that a "Animate" option is visible on the toolbar every bit showcased in the image higher up.
Click on it to add an animation to the image. This is another way to add blitheness to an object.
Step-3: Select the Type of Animation
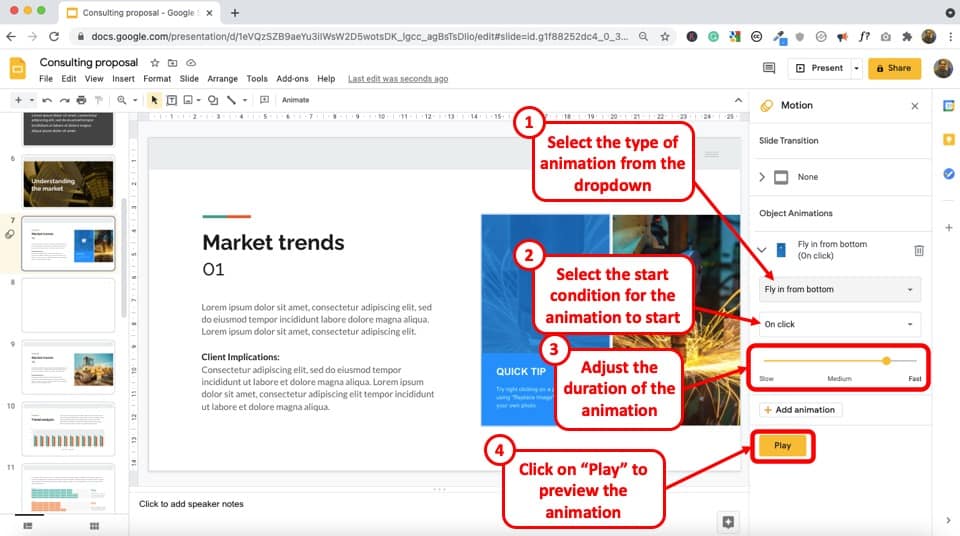
Depending on the type of transition you desire, choose one. For this example, I've gone with the "Fly in from Bottom" blitheness option.
Step-iv: Select the Start Condition for the Animation and the Duration
A time tin exist chosen depending on when you lot want the Object or Image to show. Press the "On Click" tab to allow the Paradigm or Object to appear one at a time. Other options include "After Previous" and "With previous".
Likewise, you can choose how fast or irksome the animation testify appear using the "Elapsing" option. Drag the slider towards right or left.
Footstep-5: Preview the Blitheness to Come across the Result
To preview the animation of the Epitome or Object, click on the xanthous "Play" tab at the bottom of the section.
To end the preview of the animated Image or Object, click the "Stop" button.
half-dozen. How to Add a Motility Path Animation in Google Slides?
Motion path animations allow an object to move along in a certain path. This could be from right to left, upward or down, or even diagonally.
Unfortunately, Google Slides doesn't take an choice to add a motion path animation on the slides directly. However, motion path animation can be recreated by using duplicating the slides and changing the position of the object slightly on each slide.
Unlike PowerPoint or Keynote, Google Slides doesn't have an selection to add "Path Animations". However, the desired result can also exist accomplished with what is called a stop motion blitheness.
Bank check out the video below that explains the process of creating a stop motion animation in Google Slides –
7. How to Loop Animations in Google Slides?
Looping animations in Google Slides is not possible till now. However, you tin create loop animation for an object, paradigm, or text box in Google Slides using a hack. Let's understand that in farther detail.
Step-one: Create an Object on your Slide
The object created can be from the "Shape" tab, or an image, or a text box. It can incorporate statistical numbers or pictures related to the topic of the Presentation.
Footstep-two: Right Click and Select Breathing Tab
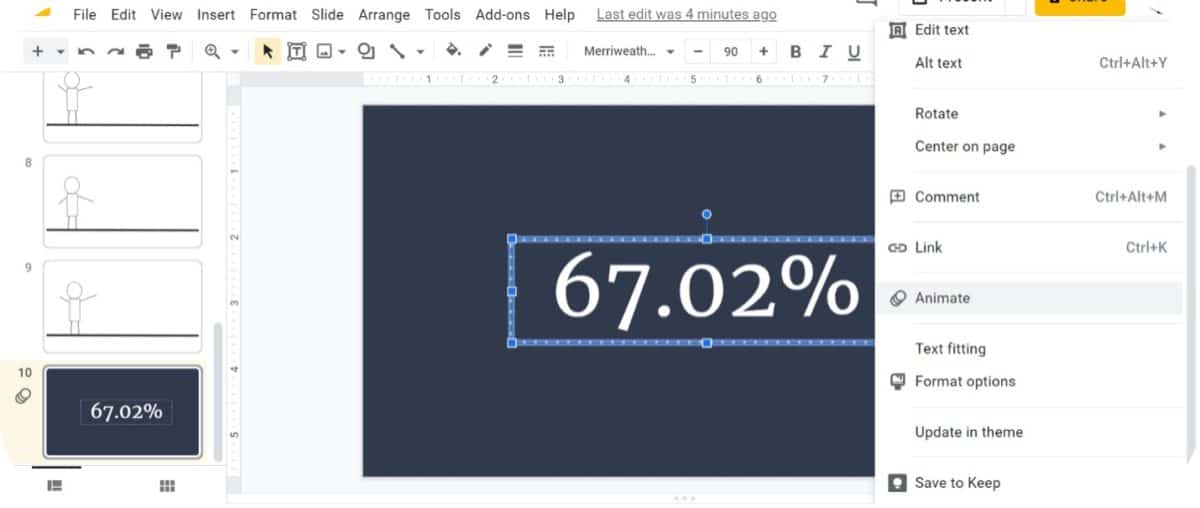
Right click on the mouse and Select on the "Animate" tab to add animation to the already existing object.
Step-3: Select the Object to Add Looping Animation
After the animation sidebar pops up, make sure that the desired object is selected by clicking on it.
Step-4: Add Animation and Timing to your Object
Supposing that yous want a Spin Loop Blitheness. From the transition choice, select the "Spin" tab available on the bottom of the transition type list.
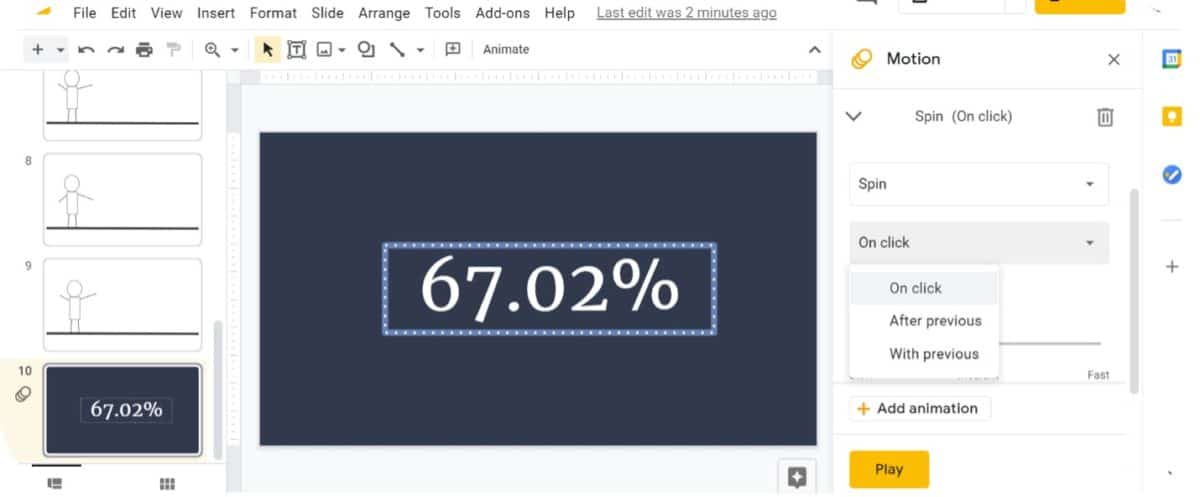
To select the time appearance of the object, select "On click" tab available on top of the listing. This starts the animation when the object is clicked.
Step-5: Create Second Animation
Now, click "Add animation" button to create a second animation for the object. Select "Spin" bachelor at the bottom of the list over again to maintain coherence.
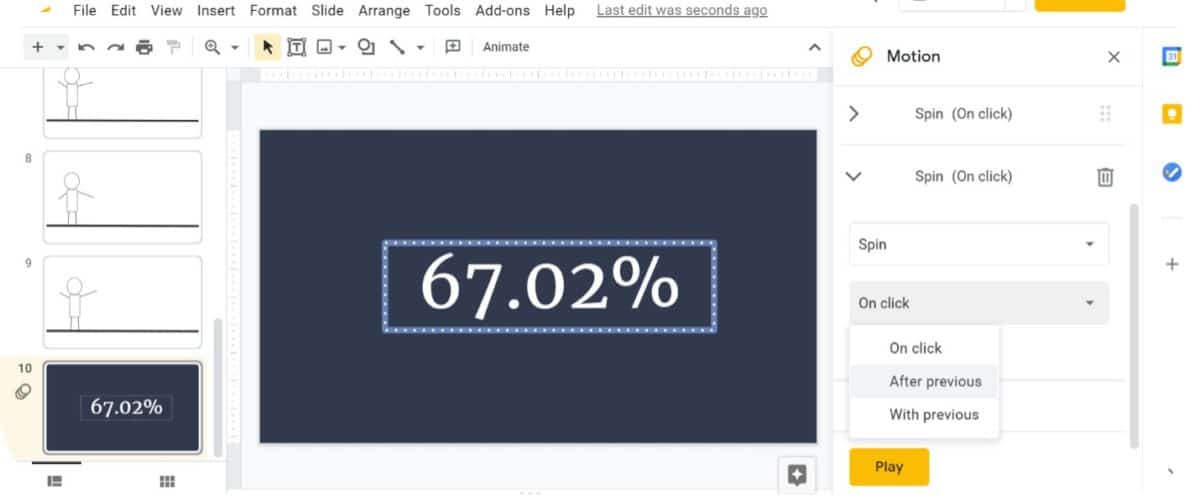
For the fourth dimension of appearance of the object, click "Subsequently previous" bachelor as the 2d option on the list. This ensures the object appears after the first animation process.
Footstep-half-dozen: Repeat step 5
Depending on how long you lot want the loop animation to be, keep repeating the vth step. Subsequently a sure number of repetitions, the list of animations should show.
It is vital to ensure all the animations maintain the same speed for the object. Click "Medium" to get a moderate spin on the object.
Footstep-vii: Click Play
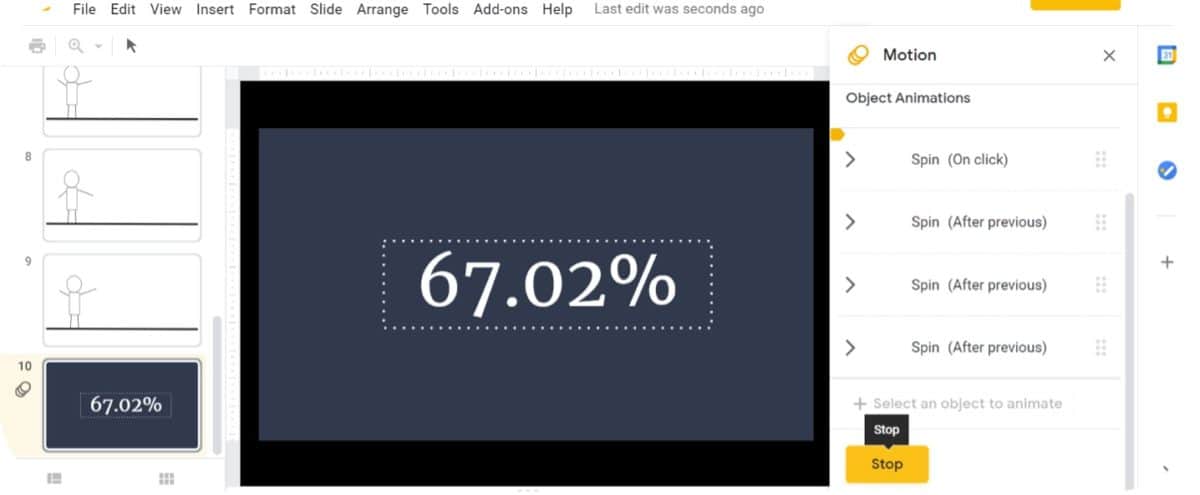
Click the "Play" button available on the lesser of the sidebar to see how the object spins in a loop animation. Click "Stop" when you desire the preview to end!
8. Can y'all Animate in Google Slides using Mobile App?
Google Slides has a very robust mobile application for both Android and iOS devices. It does have several functionalities built-in that can enable you to design a presentation on the fly!
Unfortunately, y'all tin can non add blitheness using the mobile app in Google Slides. Although the choice to add an blitheness doesn't exist on the mobile app in Google Slides, you tin can notwithstanding view a presentation that already contains animations.
You can also present a Google Slides presentation that contains animations, using just your telephone.
9. Do PowerPoint Animations Work in Google Slides?
If you have created a presentation using Microsoft PowerPoint that incorporate animations, and if you need to share information technology using Google Slides, you may be wondering whether PowerPoint animations will work in Google Slides!
In general, most PowerPoint animations are not supported by Google Slides. Notwithstanding, if y'all use animations in your PowerPoint presentation that are also nowadays in Google Slides (for eg. appear, fly in, etc.), it volition work in Google Slides.
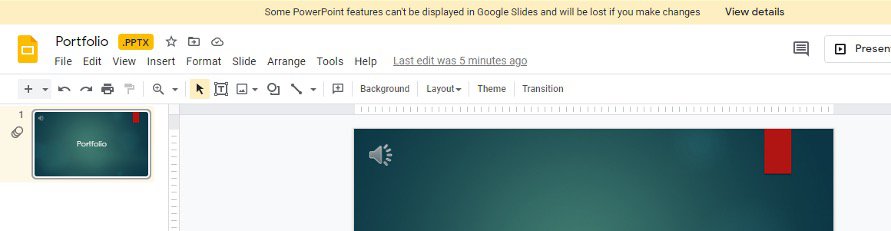
If you effort uploading a PowerPoint presentation that contains animations that are not supported past Google Slides, you will see a warning in the top part of the Google Slides window (as shown in the image above).
The mistake message will inform yous that "Some PowerPoint features can't be displayed in Google Slides and will be lost if you brand changes"
More Related Topics
- How to Set Almost Anything on Google Slides! [A Comprehensive Troubleshooting Guide]
- Practice Presentation Clickers Work with Google Slides? [Interesting Read!]
- How to Curve Text in Google Slides? Always Use THIS Play a trick on!
- How to Apply the Eyedropper Tool in Google Slides? [Even When This Tool Doesn't Exist!]
- 17 Pros and Cons of Google Slides! [Should You Fifty-fifty Use it?]
- How to Give a Presentation on Zoom? [Step-by-Step Guide!]
Credit to Wayhomestudio for the Featured Paradigm of this article
Source: https://artofpresentations.com/animate-in-google-slides/
Posted by: eppersonourthe46.blogspot.com
0 Response to "How To Animate A Picture In Google Slides"
Post a Comment